


- Bitcoin
- Ethereum
- Hemi
- Learn Center
- March 14, 2025
How to PoP Mine On the Hemi Mainnet
This guide will show you how to configure your PoP Miner and add PoP Points to MetaMask.

With the launch of Hemi mainnet, network participants can now engage in the Proof-of-Proof (PoP) mining that keeps Hemi secure. Users who PoP mine help deliver “superfinality” by anchoring Hemi transaction data to Bitcoin’s security layer. PoP miners also earn PoPPoints (POP) leading up to the mainnet Token Generation Event (TGE).
POP is completely separate from the incentive points associated with the Testnet Season and Mainnet Season participation rounds. These points will be used to calculate rewards during the TGE.
Setting Up Your Hemi PoP Miner
Setting up a PoP miner requires basic Command Line Interface (CLI) knowledge and sufficient BTC to pay Bitcoin miners for adding Hemi transaction data to Bitcoin blocks.
First, you’ll need to determine whether you want to download a pre-built binary or build from source and then identify the release you wish to use. The package you need will vary based on your operating system and architecture. Choose the correct one for your system.
Hemi’s official Github (hemilabs) is the only place to download either the PoP Miner binary or source. Do not use any other software.

Extract The Files
Once complete, the files must be extracted from their compressed format to make the software accessible. For Linux or MacOS systems, the following command initiates extraction:
tar xvf heminetwork_v1.0.0_linux_amd64.tar.gzfollowed by running the uname- command to ensure system compatibility. If the output is “x86_64,” select the “amd64” package for your OS; if it’s “arm64,” choose the corresponding “arm64” package.
Once you install the correct miner version, it’s time to launch the CLI.
For Windows systems, press Win + R to open the “Run” window, type “cmd,” and press Enter.
On macOS, press ⌘ + Space to open Spotlight Search, type “terminal,” and press Enter.
On Linux, the method varies by OS—on Ubuntu (Gnome), press Ctrl + Alt + T, while on most other distros, press the Super (Windows) key and search for “Terminal.”
With the CLI initiated, enter the command CD without pressing Enter. Next, drag the path of the extracted folder into your CLI, or type the path in manually and then press Enter.
List the files to ensure the correct configuration. To list files:
- On Windows, open the Command Prompt and type dir, then press Enter.
- On macOS and Linux, open Terminal and type ls, then press Enter.
The expected outputs for Windows should be:
bfgd.exe bssd.exe extool.exe hemictl.exe keygen.exe popmd.exe tbcd.exeThe expected outputs for Linux and macOS should be:
bfgd bssd extool hemictl keygen popmd tbcdVerify Binaries
Next, you must verify that the correct binaries were downloaded and that your system can run them.
Linux & macOS:
Mac users: First, remove the quarantine by running:
xattr -d com.apple.quarantine ./popmd and then executing the command ./popmd --helpFor Windows users issue this command in Command Prompt (not PowerShell):
xattr -d com.apple.quarantine ./popmd and then executing the command popmd.exe --helpDoing so will initiate the popMD menu, indicating a successful installation.
Setup Keys
Mining with a preexisting key imported an existing EVM or Bitcoin address? Go ahead and skip these steps. If not, you’ll need to generate your key file by following the next steps:
Linux & macOS:
On Mac, remove the quarantine before running the command:
xattr -d com.apple.quarantine ./keygenGenerate the key file:
./keygen -secp256k1 -json > ~/popm-address.jsonOpen the JSON to verify its contents:
cat ~/popm-address.jsonThe expected output should be:
{ "ethereum_address": "0x12345FabcD298299b8250e16eEb7D6a7B81DfEdC", "network": "mainnet", "private_key": "123456789abcdef123456789abcdef123456789abcdef123456789abcdef1234", "public_key": "04123456789abcdef123456789abcdef123456789abcdef123456789abcdef12345678abcdef123456789abcdef123456789abcdef123456789abcdef1234", "pubkey_hash": "m12345678P2xVWwVCWxq7tHJLGcJz2h6XYZ"}For Windows systems, use the Command Prompt (not PowerShell) from the Start Menu and generate the key file:
keygen.exe -secp256k1 -json > %HOMEDRIVE%%HOMEPATH%\popm-address.jsonDon’t expect immediate feedback from this command; this is normal.
Open the JSON file in a basic text editing program such as Notepad:
%HOMEDRIVE%%HOMEPATH%\popm-address.jsonThe expected JSON output:
{ "ethereum_address": "0x12345FabcD298299b8250e16eEb7D6a7B81DfEdC", "network": "mainnet", "private_key": "123456789abcdef123456789abcdef123456789abcdef123456789abcdef1234", "public_key": "04123456789abcdef123456789abcdef123456789abcdef123456789abcdef12345678abcdef123456789abcdef123456789abcdef123456789abcdef1234", "pubkey_hash": "m12345678P2xVWwVCWxq7tHJLGcJz2h6XYZ"}Fund Your Mining Address
Now it’s time to fund your address. If you followed the steps above, refer to the JSON file for your pubkey_hash. If using an existing BTC address, alter your wallet type to P2PKH (Legacy) and enter the pubkey hash. If using an existing EVM address, import your private key into UniSat and select P2PKH (Legacy) as your wallet type.
We advise you to follow these best practices for BTC allocation:
- Avoid sending large amounts of Bitcoin to the private key connected to your PoP miner.
- Running the miner requires ~0.002 BTC per day at a Bitcoin fee rate of 2-3 sat/vB.
- Safety Tip: Send only enough BTC for a week or a month and refill periodically instead of depositing large amounts at once.
- Before funding your wallet, review Bitcoin’s current fee rates (fee/vB) to estimate transaction costs.
- Triple check all addresses at every step of the transfer process. Read the wallet addresses before and ensure they match before sending any funds.
Running Your PoP Miner
At this point, your miner should be properly configured and funded, and you’re ready to start mining. You’ll need to execute the following command lines, filling in the denoted placeholders in as directed:
- <private_key> → Use the private key from your JSON file (Step 5) or your existing EVM/BTC private key.
- <fee_per_vB_integer> → Set the Bitcoin transaction fee in sat/vB based on network conditions.
- Set the fee according to market conditions. If you require assistance, refer here.
The commands to replace your private key are as follows:
On Linux & macOS systems:
export POPM_BTC_PRIVKEY=<private_key>export POPM_STATIC_FEE=<fee_per_vB_integer>export POPM_BFG_URL=wss://pop.hemi.network/v1/ws/publicexport POPM_BTC_CHAIN_NAME=mainnet./popmd
For Windows systems:
set POPM_BTC_PRIVKEY=<private_key>set POPM_STATIC_FEE=<fee_per_vB_integer>set POPM_BFG_URL=wss://pop.hemi.network/v1/ws/public set POPM_BTC_CHAIN_NAME=mainnetpopmd.exeSetting Up A Custom BFG Endpoint
Of note, if the Hemi-owned Bitcoin Finality Governor (BFG) is timing out due to a high load of user requests, you can use this guide to set up your own endpoint. If you do, you must change the value of POPM_BFG_URL to your own BFG.
To connect your PoP miner to a custom BFG endpoint, add the appropriate command before running the miner.
To do so on Linux & macOS, open Terminal and enter:
export POPM_BFG_URL=<YOUR_BFG_URL>On Windows, open Command Prompt (CMD) and enter:
set POPM_BFG_URL=<YOUR_BFG_URL>After following these steps confirm that the expected console output matches this:
2025-03-12 14:24:21 INFO popmd popmd.go:123 Hemi Proof-of-Proof Miner v1.0.0+20630a55c (Hemi Labs, popmd, go1.23.7 linux/amd64)2025-03-12 14:24:21 INFO popmd popmd.go:127 POPM_BFG_REQUEST_TIMEOUT: 15s2025-03-12 14:24:21 INFO popmd popmd.go:127 POPM_BFG_URL : wss://pop.hemi.network/v1/ws/public2025-03-12 14:24:21 INFO popmd popmd.go:127 POPM_BTC_CHAIN_NAME : mainnet2025-03-12 14:24:21 INFO popmd popmd.go:127 POPM_BTC_PRIVKEY : ********2025-03-12 14:24:21 INFO popmd popmd.go:127 POPM_LOG_LEVEL : DEBUG2025-03-12 14:24:21 INFO popmd popmd.go:127 POPM_PPROF_ADDRESS : 2025-03-12 14:24:21 INFO popmd popmd.go:127 POPM_PROMETHEUS_ADDRESS : 2025-03-12 14:24:21 INFO popmd popmd.go:127 POPM_REMINE_THRESHOLD : 02025-03-12 14:24:21 INFO popmd popmd.go:127 POPM_STATIC_FEE : 52025-03-12 14:24:21 INFO popm popm.go:933 Starting PoP miner with BTC address 1Gz6cq1pR777GoVeDBcA7UbpnwTygGdknc (public key 02df4b526c0a81c90308cd88af993022782e167e7b25d69006b4649f8a47d545e1)2025-03-12 14:24:22 DEBUG popm popm.go:855 Connected to BFG: wss://pop.hemi.network/v1/ws/public2025-03-12 14:24:34 DEBUG popm popm.go:609 Received new keystone with block height 13267752025-03-12 14:24:34 DEBUG popm popm.go:602 Checking keystone received with height 1326800 against last keystone 13267752025-03-12 14:24:34 DEBUG popm popm.go:609 Received new keystone with block height 1326800If you followed these steps to see the above output, congratulations! You are now operating a Hemi PoP miner!
Add POP To MetaMask
Follow these steps to add POP to MetaMask:
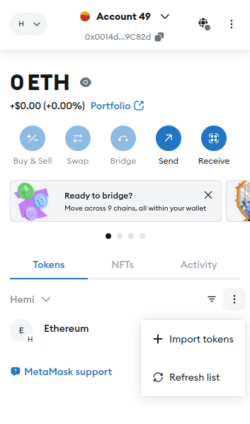
Step 1: Open MetaMask.

Step 2: Import Tokens
Navigate to tokens and select the dropdown menu. Choose the option to import tokens.
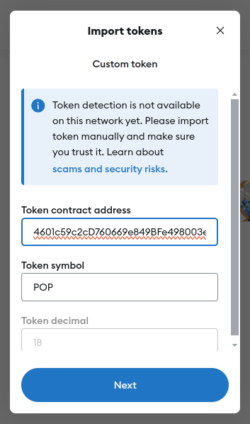
Step 3: Add Contract Address.
Enter the address, 0xC5D2E164601c59c2cD760669e849BFe498003e21, into the Token Contract Address field. If entered correctly, MetaMask will automatically populate the Token symbol as POP and the decimal spaces at 18. Hit next.
After following these steps, POP will appear in your wallet’s token list.
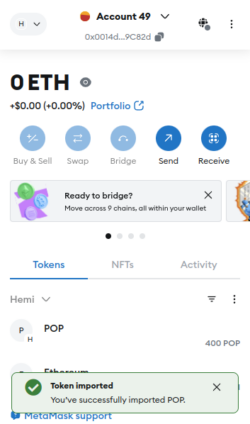
Now you’ve configured your miner and can track POP points in your connected wallet.